Do you know how to add Facebook Pixel to WordPress?
If you plan to run ad campaigns on Facebook, you need to use the pixel to optimize your ad campaign. Knowing the proper usage of Pixel is a great skill and can help you become the master of Facebook advertising. There is no alternative to Facebook Pixel if you want to run and optimize ad campaigns on facebook.
Today, I will share how to add Facebook Pixel to WordPress website in this article. If you do not know how to add pixel on WordPress, this article will be a resource for you.
What is FaceBook Pixel?
Facebook pixel (Currently known as Meta Pixel) works as a tool that generates data for assessing the performance of Facebook advertising. It can be considered as the Google Analytics for Facebook ad campaigns. You need to add the pixel code on your website so that you can track the activities of the visitors who click on your Facebook ads. These data help you analyze the data of your ad campaign and provide you with valuable insights to improve the performance of the campaign.
Things you can track with Facebook pixel:
- Pageviews.
- Add to cart.
- Purchase
- Time on page
- Optimize Ads.
- Select audiences to retarget them for future adcampaigns.
- Remarket people who have already purchased your products or done some actions on your WordPress website.
Things you will need to implement the pixel:
- Access to your WordPress dashboard.
- Your pixel’s base code or its ID.
- Access to the Facebook Ads Manager.
How to Add Facebook Pixel to WordPress
There are two easy methods that you can add Facebook Pixel to the WordPress site to get the Facebook ad campaign data.
- With code – This is a method where you will place the pixel code in the theme editor. You do not need to use any plugin for the method.
- With a plugin – You need to use a plugin if you want to adopt this method. Here, you will get some additional features than the previous one. You can get access to the pixel data from your WordPress dashboard. Today I will show you both methods of adding the Meta Pixel to your WordPress site.
How to add Facebook Pixel to WordPress with code
If you have a Facebook Pixel, then you are ready to add the pixel to your WordPress site. But if you have not created an account yet, you need to create a pixel account before adding the pixel to your website.
Step-1: Log in to your Facebook account
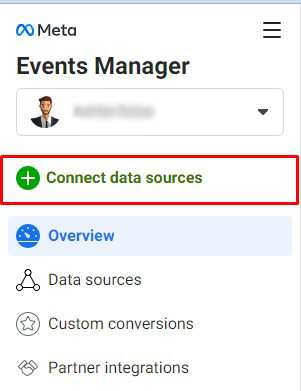
Step-2: To create a pixel account. Go to Event Manager and click on Connect data sources.
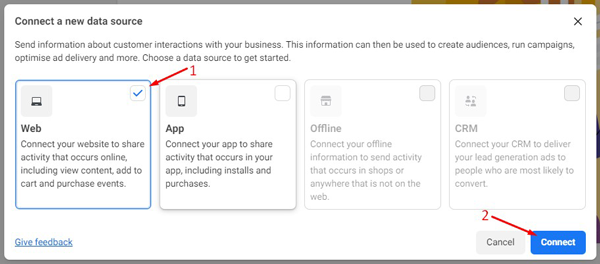
Step-3: You will see a popup prompt where you have to choose a data source. Select the Web and then click on Connect button.
Ste-4: You will get another popup where you need to type your pixel name and then click on the Create Pixel button.
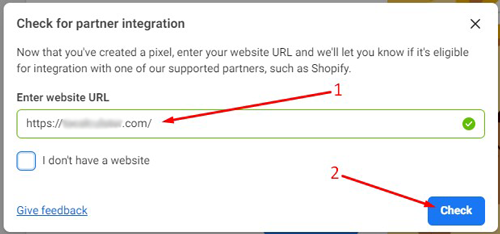
Step-5: Your pixel has been created. Now you need to enter your website URL and click on the Check button. You should see a correct green sign on the right side of the website URL if you put a valid URL.
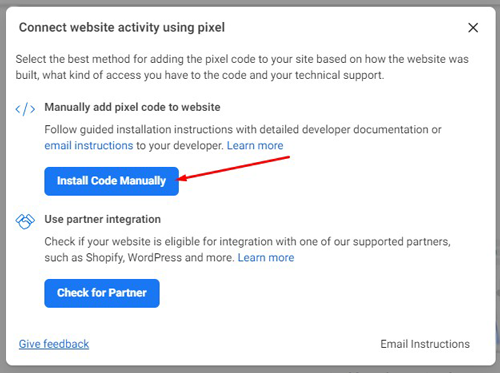
Step-6: Click on Install Code Manually as we use the method now.
Step-7: You need to copy the base code and paste it to the website.
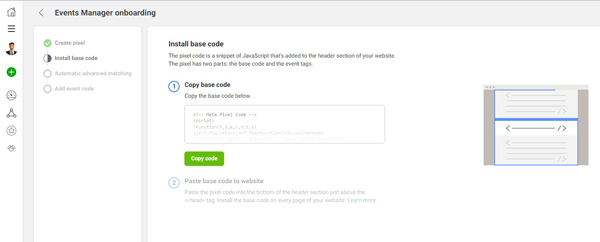
Step-8: Place the code in the header section of the theme.
How to add Facebook Pixel to WordPress with a plugin
In WordPress, you can use some third-party plugins to add Facebook Pixel to your site. Today we are using the plugin called PixelYourSite for the article. Using the plugin help, you integrate your website with other platforms such as Google Analytics and Pinterest.
Go to Plugins> Add New and then search for the PixelYourSite plugin. Then you need to install and activate the plugin on your WordPress site.
Let’s see how to configure PixelYourSite
Step-1: Select the PixelYourSite from WordPress Dashboard and click on the Click for settings button on the right side of Your Facebook Pixel.
Step-2: Go to the Facebook event manager and get the Pixel ID.
Step-3: Now put the Pixel ID you copied in the Meta Pixel ID field. You can also make changes to the page and save your settings.
Let’s test if Facebook Pixel is working
As we have already added the Facebook Pixel to our WordPress website, we should get the data from the pixel. We will check it using the Facebook Pixel Google Chrome Extension. Install the extension to your Chrome browser and go to your website where you installed the Facebook Pixel. You can click on the extension to see the pixel data, just the image I am sharing below.
Conclusion
These are the two methods of how to add Facebook Pixel to WordPress and you have the absolute freedom to choose the one you think is the most suitable for you.
You may also read: How to Edit the Header in WordPress